Showing posts with label Nail Polish. Show all posts

Oct 1, 2013


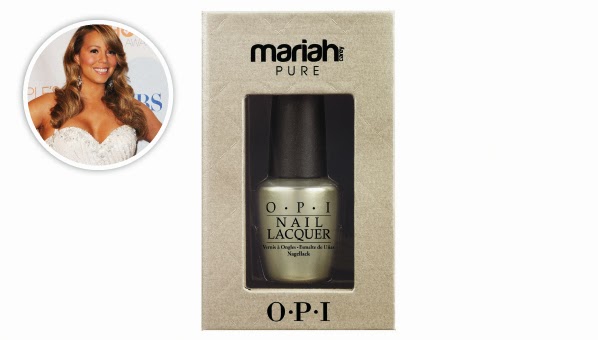
In October, Mariah Carey will be debuting her third line of nail lacquer with OPI and this time she's got a doozy. Mariah Carey's debuting 18 Limited Edition Colors including a Top Coat made of Pure 18K Gold & Silver Leaf Flakes! Can you believe that? DIVA is the only thing to describe that hunti, LOL. Now I know what you're wondering: How Much is This Luxurious Top Coat Going to Cost? Well according to the OPI Executive VP & Artistic Director Suzi Weiss-Fischmann:"The luxe polish was inspired by the singer’s “extravagant style,” and allows for people to “embrace their inner diva without breaking the bank,NOT GONNA BREAK THE BANK?!! Let me tell you guys how much this ONE polish will cost...$30! 

For ONE BOTTLE of Polish!!!! Okay to me that is breaking the bank. But if you want to get it you can. It will available at Ulta in October. There some colors available now at Drugstore.com and Walgreens. But here is the full collection:


All I Want for Christmas
(is OPI) ($9)

All Sparkly and Gold ($9)

Baby Please Come Home ($9)

Cute Little Vixen ($9)

Emotions ($9)

I Snow You Love Me ($9)

Sleigh Ride for Two ($9)

It’s Frosty Outside ($9)

Kiss Me At Midnight ($9)

Make Him Mine ($9)

My Favorite Ornament ($9)

Silent Stars Go By ($9)

Ski Slope Sweetie ($9)

In My Santa Suit ($9)

Underneath the Mistletoe ($9)

Visions of Love ($9)

Warm Me Up ($9)

Wonderous Star ($9)

Loving the colors for Mariah's new line of polishes but honestly I can do without the $30 bottle of polish. I'm sorry its just too over the top for my tastes. I can't and won't spend that much on a polish. I hate spending $9 on OPI now! Seriously I grit my teeth every time I pull out my card and purchase 3 polishes and it cost me $27 + Tax. Anyway Mariah Carey x OPI Holiday Polish Collection will be available sometime this month! Look for it in ULTA!

Source: SheFinds

Sep 3, 2013


Nail company NCLA has released a new nail wrap collection inspired by the 90s cult fave movie and show Clueless! They've dubbed the new collection: Whatever! The colors and designed are beautiful and I absolutely love it! You can buy all 4 and mix and match the different wraps to create your own unique nail wrap manicure! 

If you don't know how to use a nail wrap here's a tutorial from NCLA's YouTube channel:


Check out the Whatever! Collection and click each link to visit NCLA's site to purchase these nail wraps and browse their other collections of nail wraps and nail lacquers too!


Tutorial for Nail Wraps coming soon!
Source: NCLA

Aug 10, 2013

Need a sure fire fast method to dry your nail polish? Then check this out:


Drying Nail Polish Quick! 


Dunk your hands in a bowl of ice-cold water. “The cold water freeze-dries polish, sealing and hardening it quickly. Allow nails to air-dry for two minutes, then submerge in ice-cold water for three minutes, which is enough time for the polish to harden completely.


Source: Pinterest.com & NailArtStyles.com

Aug 1, 2013


I'm all for false nails. They look great and when done properly you can't tell the difference between the real or fake. But acrylics, gel, glass, etc they can wreak havoc on your real nails. To prepare your nails for the healing process after the removal of the fake nails, you will need a few key items to achieve that. Here are some steps to help you remove acrylic nails:


Steps to Remove Acrylic Nails


Method One: Soak the Acrylic Nails in Acetone

1). Clip your nails. Use a nail clipper to trim the tips of your acrylic nails short. Cut off as much of the acrylic as possible. If cutting is difficult due to the thickness of the nails, use a course nail file to file them. But make sure you don't catch any of your nail bed because it will bleed.


2). File the topcoat off of the nails. Use a fine-grade buffer to file off the paint and remove a much of the acrylic as possible. Use long strokes that run the length of the nail.

3). Warm up some acetone. Pour the acetone into a small glass bowl and cover the top of the bowl with plastic wrap or foil. Use an elastic band to hold the plastic wrap or foil in place.
Place the bowl of acetone into a bowl of hot water. Ensure the waterline is below the top of the bowl with the acetone so the water doesn't mix with the acetone.
Wait 3 to 5 minutes for the acetone to warm.
4). Apply petroleum jelly to the skin surrounding your nails. Acetone dissolves plastic and is also hard on skin, so it's important to protect yourself. This step will prevent your skin from becoming irritated by the acetone, particularly if you have hangnails.
Take care not to get too much petroleum jelly on your nails, since the acetone should be able to reach it and dissolve it.
Use a cotton-tipped wooden applicator if you need help applying the petroleum jelly more precisely.
5). Apply the acetone to your nails. Saturate a cotton ball per nail in the warmed acetone, then place the cotton balls on the tips of your fingers. Wrap them tightly against the acrylic nails using strips of aluminum foil. Let your nails soak in the acetone for 30 minutes.
You use a non-plastic tape to fasten the cotton balls if you don't have aluminum foil.
You can also simply soak your nails in the bowl of acetone if you know that acetone doesn't irritate your skin.
6). Remove the foil and cotton balls from your fingertips. The cotton ball and the nail should come off easily.
If you soaked your acrylic nails in the bowl of acetone, gently pry the nails off using an orange wood stick.
If the acrylic nails are still firmly stuck, repeat the process for another 20 minutes and attempt to remove them again.
7). Scrape off the leftover acrylic with the nail buffer. The acrylic should be soft from the acetone bath, so take the opportunity to buff the rest of it away. If the acrylic begins to harden again while you're buffing, use a cotton ball soaked in acetone to dampen it.

8). Shape your natural nails. Use nail clippers and a nail file to smooth the edges. Buff your nails lightly with a fine-grade nail buffer, moving from the base of the nail to the tip.
To avoid damaging your nails, file in one direction only, and avoid using a sawing motion.
The top few layers of your nails may have been removed with the acrylic. Be careful not to tear or damage them further when file and buff them.
9). Restore the moisture to your hands. Acetone causes skin to become extremely dry. Rinse off the remaining traces with soap and water. Dry your hands and rub them with body oil, olive oil or a moisturizing lotion.

Essential Tools:

Nail Clipper
Finger Nail File 
Gel Cuticle Remover
Mini or Large 4 Way Buffer
Hand Cream (Your Fave or the one I use Moisture Therapy by Avon)
Cuticle Oil
Nail Hardener (Not Pictured)
Polish of Your Choice (Clear or Colored it's Up to You)


Okay give your hands a day to rest from the acetone or whatever removal method you use. Then you will start the process of getting your hands back to normal. 

Step 1: Use your cuticle remover gel. If you have the one I have which is Sally Hensen, you place a thin strip of of the cuticle gel on every cuticle. Allow it to sit for 2 to 3 minutes (it can sit for no longer than 10 minutes). Push down your cuticles with the cuticle stick. Remove the excess cuticle gel and cuticles. You can also use the nail clipper to cut the excess cuticles off but they should remove easily with the cuticle gel. Just follow the directions on the tub and you should be fine.
Step 2: Cut down your nails and even them out. Use a file to shape the nail.
Step 3: Use the 4-Way buffer to buff your nails until the surface is even and shiny. 
Step 4: Use the cuticle oil on your cuticles. Wash your hands thoroughly. 
Step 5: Apply Nail Hardener 
Step 6: Polish if you like.
Step 7: Once your polish of choice has dried use your hand lotion to lotion your hands. 

*Side Note: If your looking for softer hands you can use a sugar or salt scrub to make your hands softer after you buff your nails. 

Your nails will slowly heal and go back to normal. All they need is a little tender loving care, TLC! 

Hope this helps! If you have anymore questions, join the blog and email me! 
designsbytiffanye@gmail.com

May 28, 2013

Lucky Magazine has released some beauty must haves for the season. I'm going to tell you about them and add some little tidbits of my OWN! So let's get started:

Makeup & Nails
Becca Ever-Matte Poreless Priming Perfector $36: This targeted oil-control primer eliminates excess oil for perfected, mattified skin that lasts up to 8 hours. Use a pea-sized amount dabbed onto specific areas of concern.
 Okay you would use this on your skin alone or under your makeup. This will give you a shine free look. Very necessary during the spring and summer because of those fluctuating hot summer days. Anything temp above 65 degrees can ruin your makeup look if you dont't use either blotting powder and or primer under your foundation. 
Benefit Cosmetics’ fine-one-one $30: Fine-one-one to the rescue! This sheer brightening cheek & lip color gives your look instant LIFT, SHAPE and POP. Glide on the three shades—pink champagne, sheer watermelon and soft coral—for a sheer coral pink flush that builds from soft & natural to bright & cheery.
So this little betty is a makeup lovers DREAM! It can be used in several ways: contour your cheeks, add a slight flush of color to your cheeks or give your lip a fresh pop of color. The fine-one-one is a must have in your beauty arsenal.
Yes To Grapefruit $5.99: The Yes To Grapefruit Brightening Facial Towelettes leave your face feeling cleansed, exfoliated and lightly moisturized. Achieve soft, bright and touchable skin while keeping your conscience clean because, of course, they’re compostable!
I've been a fan of Yes To...EVERYTHING (They have more than one product line such as Yes to Carrots, Yes to Cucumbers, Yes to Blueberries, and Yes to Tomatoes) LOL for a long time. I've used Yes to Carrots before for skin care. Yes to Grapefruit is great product and honestly I couldn't have picked a better product. It smells really really good! It really does make a great makeup remover. Its inexpensive and you can stock up on the product and make it readily available for yourself. 
Sally Hansen’s Fuzzy Coat textured Nail Color $6.49: Transform your nails with Sally Hansen’s newest nail innovation: Fuzzy Coat textured Nail Color. Taking Inspiration from the strong textural themes at the latest runway shows, Sally Hansen has developed a new, exclusive special effect formula that makes nails the focal point of any look. The breakthrough formula goes where no nail color has gone before, create eye-catching optical effects and adding texture to your manicure. Blurred, woven and marbled fiber looks resembling hand-spun yarn are combined in a multidimensional network of color to create a matte finish with fibered a texture effect.
Sally Hansen Watches via Project-Swatch.com
I used to be very adamant about not getting nail polish. I never thought I could wear it. But then I just fell in love with the colors of the polishes that I saw in different tutorials and at the nail shop. I'm so excited about this Sally Hansen nail color. Its so beautiful and its a really trend. Affordable for those of us who can't afford the nail salon every 2 weeks. 
There are some other products you may want to be on the lookout for. Like Essie nail polishes. They are very affordable and highly pigmented. Great colors available for the spring and summer months. Neutrogena, Oil of Olay, and Simple have very affordable makeup remover wipes and solutions they will cost you about $2 more but they are great products. They are gentle on the skin  (especially the Simple products) and will remove all the gunk off your face including makeup.


NYX Cosmetics Stick 
L'Oreal and Prestige have some very affordable facial primers that will give the same matte effect for a fraction of what the Becca costs. Both products are available your local drugstore. Another alternative is NYX Cosmetics Stick Blush. Its only $6 and does the exact same thing as the Benefits fine-one-one. It also has a wider variety of colors.


Skincare
Bliss ‘fuzz’ off facial hair removal cream $24: Isn’t it time your lip came out of hiding? Formulated with skin-soothing willow herb, vitamin E and a moisturizing botanical complex, this fresh-scented, one-step hair removal cream features a unique two-sided, dual-textured tip to help gently nix facial fuzz in three little minutes. 
Bliss Fuzz Off!


So for all you girls that know you have that little "stache" problem no worries Bliss is here to save the day! It provides 1 step treatment that only takes 3 minutes. Can be done before you put on your makeup. Cause if your like me and you wear red lipstick or any color that is light or contrasting of your skin tone; it can show that fine or heavy mustache hair above your lip. 
NEUTROGENA® Beach Defense™ Sunscreen Lotion Broad Spectrum SPF 70 $10.99: Formulated with HELIOPLEX® Technology for superior broad spectrum protection, this NEUTROGENA® Beach Defense™ Sunscreen Lotion is sweat-resistant and water-resistant for up to 80 minutes.
Neutrogena Beach Defense SPF 70


I'm not a beach girl or even an outdoor girl. But if I was I would most definitely use some sunscreen. This stuff is really strong and works really well in blocking those strong rays. Well if your a tanner or a beach goer this is a definite must!
Vaseline Spray & Go Moisturizer Total Moisture $7.99: Vaseline Spray & Go Moisturizer is a continuous spray lotion that moisturizes and absorbs in 10 seconds or less so you can put your clothes right on and get on with your day. Vaseline Spray & Go Moisturizer leaves skin feeling instantly soft – not sticky or greasy.
Vaseline Spray & Go
This is ingenious! I love Vaseline, its a great product. But it used to make me so greasy and I hated that! But now that they have the Spray & Go I love it!!!! I went to go get some at my local drugstore but they were sold out! Anyway its a great idea for those of us who have dry skin and don't want to be greasy! 
Great finds here but you can also use the Yes to Carrots, Yes to Cucumbers, Yes to Blueberries, and Yes to Tomatoes for lotions, facial cleaners and more! They have a whole line dedicated to skincare. They are very affordable and available anywhere skin care products are sold!
Hair
Carol’s Daughter Monoi Oil Sacred Strengthening Serum $30: This lightweight, silicone-free, miracle oil reverses and prevents damage to even the most distressed hair caused by heat-styling, color-treating and chemical straightening. Its strengthening power comes from Monoi Oil – a sacred Tahitian blend of the Tiare Gardenia Flower and Coprah Coconut Oil. This silicone-free, restorative oil rebuilds your hair’s structure from the inside out for true repair that doesn’t wash away or weigh hair down like silicones do. It’s also blended with Mirabelle Plum Seed Oil to restore health and Kukui and Rose Hip Seed Oils to reduce frizz and boost your hair’s natural shine. Take your hair to its maximum strength and length – no matter what you do to it. 
I really like Carol's Daughter products. They cater to all hair types and thats important for an african american woman. I love the fact that it can cater to curly hair and naturally straight hair. Its an awesome product and affordable.

Some other products I would recommend is Clear Shampoo and Conditioner its a great hair care that is available everywhere and more than affordable. It starts at $8.99. Or if you want something with a better smell and then try Herbal Essences Honey I'm strong. Its a very thick formula that coats every strand and works really well for Co-Washing as well as shampooing and conditioning.  You can find these products everywhere most of you local drugstores will carry both hair care products. Both of these products work on both relaxed and natural hair (mainly for transitions from relaxed to natural).

*Another Tip: You can make your own essential oil for your hair. Just go to your local drug store and you find Castor Oil, Jojoba Oil, Coconut Oil, Almond Oil, Avocado Oil, etc. If not in the drug store then just search Amazon.com and you will find everything you need!

Source: LuckyMag.com & WendyShow.com 

May 14, 2013


I got into Julep Maven a year or so ago when my mom mentioned it to me. We were going to the nail shop (thats our thing, our mother and daughter outing) and I expressed that there weren't enough variety of a colors in the shop. She remembered this membership program where you can put in code and get your first box of polish for just $0.01! It was so hilariously crazy I tried it and it worked! I've been hooked ever since. 
May Boxes for All Style Profles!
Julep Maven was founded by Jane Park and Kate McDonald. It is a beauty box company and they also provide nail parlor services in a select area. The nail parlors are limited to the Washington state area. But hopefully with the widely popular expansion of the company and its extensive reach they will have nail parlors pop up all over the united states soon. Julep Maven has been featured in O Magazine, Allure, Seventeen, Cosmopolitan, and more! And you know if Oprah endorses you then you've got it made honey!

Here's How Julep Maven's Membership Program Works: Standard membership is $19.95 a month.   However those boxes are customizable which will change the price of your original beauty box. You can add extra polish, mascara, lip gloss, cuticle oil, top coat, base coat, whatever is available you can add it to your box! Shipping is free and a small discount is given to all Mavens (Membership Holders) on every product on the site. There are different packages available for people who would like to pay their memberships up. You can pay monthly, every 3 months, every 6 months, or annually. Originally those options were available on the site if you would like to change your pay frequency then you would have to contact customer service. 

Julep Maven has style profiles. You take a simple style test that gauges your personal style and you will be classified in one of these profiles: It Girl, Boho Glam, Bombshell, Modern Beauty, and Classic with a Twist. But don't worry if for some reason you don't like the way you've been classified then you can change your style profile. 

This Months Box: Clara, Coca, & Paris 
along with 3 Hair Pins

Here's My Style Profile Breakdown:

Style Profile: It Girl
Monthly Payment: Can Range from $19.99 to 54.99 (Depending on What I Want ;)
Favorite Colors: Hailee, Harper, Clara, Rebel (Named After the Forever Funny Rebel Wilson of Bridesmaids and Pain & Gain), Courtney, Simone, Nina, Helen, and Marion. 

Paris (Glitter), Coca 
(Chocolate Brown), 
Clara (Cream Peach)
I actually used Clara at the nail shop. My favorite nail shop here in Cleveland, Ohio is Exotic Nails on Brookpark Rd. Its small and they do excellent quality work. Plus the prices can't be beat!
Anyway here's a picture of my nails using Clara (Along with OPIs Tazmanian Devil Red) at the nail shop: 

I love Julep Maven. I've never been one to wear polish I never saw the point of it until my husband and father insisted that I began to get my nails done. You feel feminine and ladylike with your nails nicely manicured. I never thought I would be that girl but I'm so glad that I am! 

Subscribe to My BLOG I Update it often!

Follow Me on Social Network!

Instagram: @psychdesign
Twitter: @PsychDesignTV

Follow Us @PsychDesignTV